Eclipse Configuration
- Former user (Deleted)
Owned by Former user (Deleted)
Last updated: Jul 29, 2009Version comment
1. Install Subclipse
Subclipse is a plugin that integrates a Subversion client and various related tools into Eclipse.
- Go to http://subclipse.tigris.org/
- Click Downloads and follow the instructions.
2. Check out a branch or the trunk from our repository
- In Eclipse, choose File > Import ...
- Choose SVN > Checkout Projects From SVN... and click Next
- Create a new repository location: https://viki.eecs.harvard.edu/repos/ct3
- Select either the trunk, or one of the branches and click Next.
- Choose "Checkout as a project in the workspace" and click Next
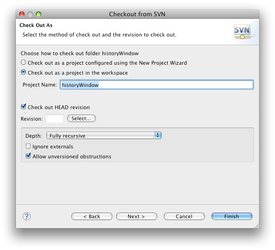
- Use the default workspace location (which should probably be /Users/yourname/workspace)
- Click Finish and wait for the code to be downloaded.
3. Make the project into a Java project
Eclipse inexplicably has no feature to automatically recognize Java projects, so we need to do this manually.
- Close Eclipse.
- Navigate to the checked-out folder (usually the name of the branch) and open the .project file in a text editor. Note that the file may be hidden on your system.
- Change
to
<natures></natures>
<natures><nature>org.eclipse.jdt.core.javanature</nature></natures>
- Save and close the .project file
- Re-open Eclipse.
4. Set up the Eclipse build path
You'll want Eclipse to be able to find and build all your code so that you can use Autocomplete, edit-time code checking, and debugging. This requires some setup.
- In the Package Explorer, right-click on your project and choose Properties.
- Go to Java Build Path.
- On the Source tab, remove any existing entries, and click Add Folder.
- Select the
agents,gameconfigs,gui, andsrcfolders. Depending on your project, you might have additional folders that contain Java code; you should add those here. - On the Libraries tab, click Add JARs
- Navigate to the
lib/jarsfolder and choose all of the JAR files that it contains.
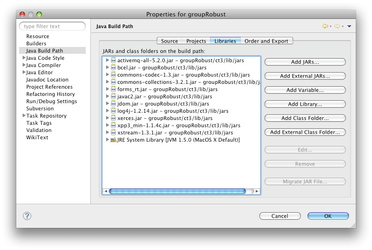
- Click OK.
- Eclipse should now reorganize the package hierarchy in the Package Explorer.
5. Access Ant from Eclipse
You can load CT's build.xml into Eclipse, making it possible to run Ant targets without opening up a command line.
- In Eclipse, choose Window > Show View > Ant
- In the new empty Ant pane that appears, click on the leftmost icon (a + next to a small ant) to add a build file.
- In the list that pops up, expand the CT3 folder and select build.xml.
- You'll now see an entry labeled
coloredtrailsin the Ant pane. Click the + or arrow next to it to expand it. - You can now double-click any of the targets to run them.
, multiple selections available, Use left or right arrow keys to navigate selected items