WebCT Project
- Former user (Deleted)
Welcome to the WebCT wiki page. Like the project itself, this page is still under development. If you have questions about WebCT feel free to join the Colored Trails development group; as a member, you may send emails to coloredtrails-development@eecs.harvard.edu.
Contents
1. Overview
2. #Resources
3. #Get the Latest Version of WebCT
4. #Startup
6. #Jetty and the WebCT Servlet
Overview
WebCT is an effort to port the Colored Trails behavioral testbed to the web. The project will benefit future CT experimenters by allowing them to utilize participants in vastly separate locations and use the WebCT development team's own Harvard EECS server resources. In its final form, WebCT will enable researchers to construct experiments in which participants and administrators interact with the Colored Trails software through only a web browser.
At present the WebCT framework is incomplete. All the separate components that will be part of the final testbed have been substantially implemented, but important decisions have yet to be made regarding browser-side GUI elements, general Harvard EECS Colored Trails resources, and WebCT clients. The CT development team is, however, poised to begin constructing a final, user-friendly version of the project that will be compatable with current CT configuration classes. Given WebCT's unfinished status, this documentation page is more of an introduction to the project's different components than a "how-to" developer guide. When an experimenter-friendly version of the project is ready for distribution this page will be updated to enable researchers to immediately start building their own WebCT experiments.
In a nutshell, WebCT is simply the present CT3 trunk plugged into a standard Google Web Toolkit (GWT) browser-servlet web application framework. WebCT utilizes the same ColoredTrailsServer object as CT3 and does not prevent researchers from using previously developed custom configuration classes, agent clients, GUI clients, or game controllers. A Colored Trails web adaptor has been partially implemented as part of this project; in WebCTs distributable form, multiple instances of this adaptor will be wrapped by the WebCT Java Servlet so that remote procedure calls (RPCs) originating from user browsers can interact with respective clients without the use of Java Messaging Service (JMS) methods. To date, the WebCT development team has exclusively used GWT to generate the web browser GUIs and javascript that future experiments will employ. GWT and the Jetty continuation package have been utilized in order to create the Java Servlet that mediates between user web browsers and the CT client and server objects. It should be noted that the WebCT servlet is currently designed to be handled exclusively by a Jetty servlet container. The reason behind this constraint is detailed elsewhere in this document; the current servlet code will be revised after the release of the Java Servlet development package 3.0, at which point WebCT developers will be free to use any servlet container they choose.
The following figure depicts the architecture behind an example WebCT experiment:
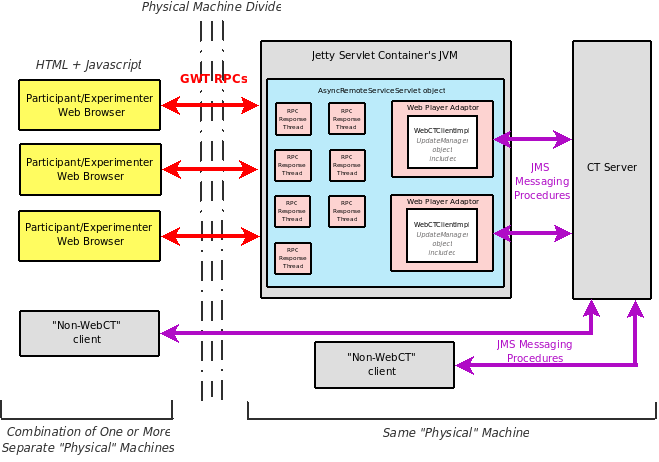
A few key features of this architecture merit particular attention. First, the "Non-WebCT" client boxes refer to any possible CT client that was developed prior to WebCT. These could range from human GUI clients to game-specific agents, and there could potentially be any number of them at any location on the network containing the host machine of the CT server object. In the particular architecture shown above, one non-WebCT client is on the same physical host machine as the CT server while the other is not. As this diagram implies, it is possible for participants using Java GUI clients and participants using CT web browser pages to play the same exact game of Colored Trails at once.
Second, there are two different communication methods between different objects in the framework. The web browsers use RPCs (reliant on hyper text transfer protocol or "http") in order to send/receive data from the WebCT Java servlet. Meanwhile, the same JMS messaging system (reliant on transmission control protocol or "tcp") that currently powers CT3 remains responsible for the transmission of data between client adaptors and the server. The WebCT development team currently has no intention of modifying the JMS methods or their usage in the CT3 trunk code.
Finally, it is important to recognize that all of the web player adaptor clients are booted on the same JMS as the Jetty servlet container. Developers familiar with previous versions of Colored Trails have probably used Apache Ant commands like:
>>>ant runserver
>>>ant runclient1
>>>ant runclient2
Executed in sequence on commandlines for the same computer, these entries would start three different CT objects (ther server and two clients) such that each object is contained within its own Java Virtual Machine (JVM). In fact, many Colored Trails objects cannot share JVMs with certain other game objects. It is impossible, for example, to boot multiple GUI clients in the same Java process with the current Colored Trails trunk code. Furthermore, the CT server must exist on a separate JVM than any clients. Thus, the decision to design all the web clients to run on the same JVM is a somewhat stark departure from previous CT development philosophy.
Resources
To understand the WebCT framework end-to-end one must be familiar with a number of different technologies and tools that are referenced in this section. The official release of WebCT will not require that its users be familiar with all these different elements if they are conducting experiments that are compatible with the current CT trunk. However, the following links should prove valuable for future WebCT core developers and experimenters who need to modify trunk code to achieve their research goals.
Google Web Toolkit (GWT) -- http://code.google.com/webtoolkit/
-- http://google-web-toolkit.googlecode.com/svn/javadoc...
GWT compiles a subset of the Java language along with its own special modules into several versions of browser-specific Javascript that run within a specified HTML page. The WebCT project uses GWT to create all of its web pages and game GUIs. Web development with GWT is more similar to building Java GUIs with AWT and Swing than creating dynamic pages by writing raw HTML, Javascript, and CSS. Detailed GWT tutorials and documentation can be found through the first link. A shortcut to the actual Javadoc page for the com.google.gwt package (which contains all the browser user interface content) is found through the second link.
Eclipse -- http://www.eclipse.org/downloads/
Eclipse is the prefered IDE of the WebCT development team and happens to have a very nice GWT plug-in. The above link references the Eclipse download page.
Jetty Servlet Container -- http://www.mortbay.org/jetty/
Jetty 6.1.19 (or later) is the only servlet container that is compatible with WebCT in its current form because of its project's reliance on Continuation objects. The previous link connects to the Jetty homepage.
Jetty Continuation -- http://mvnrepository.com/artifact/org.mortbay.jetty/jetty-gwt/
-- http://docs.codehaus.org/display/JETTY/Continuations
-- http://docs.codehaus.org/display/JETTY/GWT
-- http://docs.codehaus.org/display/JETTY/GWT+RPC+Examples
These links reference pages related to the jetty-gwt Continuation package. Through the first link one can find the package downloads for different Jetty versions. Tutorials concerning the package's classes and Continuations can be found through the remaining links.
Java Servlet Technology -- http://java.sun.com/products/servlet/overview.html
The above link connects to the Sun Microsystems page for Java Servlets. From there one can find package downloads (which shouldn't be needed if you've downloaded GWT), API documentation, relevant articles, information about previous and future specifications, etc.
Java Core API Documentation -- http://java.sun.com/javase/6/docs/api/
The Java programming language is at the heart of WebCT (and, more generally, all of Colored Trails). Through the above link one can find the Javadoc for SDK 6.
HTML, Javascript, and CSS -- http://www.w3schools.com/
GWT removes much of the headache of writing HTML and Javascript but it's probably a good idea to understand these lower-level web application components. Furthermore, HTML element "style" attributes must sometimes be progmatically set to specific value strings to get certain WebCT widgets to behave correctly, so understanding CSS facilitates better understanding of browser Java code. This section's link references the W3School homepage for web-building tutorials and documentation. Generally speaking, web search engines seem capable of finding anything one needs to know about HTML, Javascript, and CSS.
Get the Latest Version of WebCT
The entire WebCT project is now available as a branch in the Colored Trails respository. Assuming that you have svn installed, enter the following command on your computer's terminal to obtain the WebCT development team's latest code and compiled WAR:
>>>svn checkout https://viki.eecs.harvard.edu/repos/ct3/branches/WebCT
Notice that downloading the project in this manner does not enable you to make official changes to the actual WebCT branch. If you are a member of the Colored Trails development team or have been granted the access priveleges necessary to make official repository changes, then "checkout" the project with:
>>>svn checkout https://viki.eecs.harvard.edu/repos/ct3/branches/WebCT --username <name>
Replace the tag <name> with your actual respository username. If you are a developer who is new to subversion, this tutorial should help you understand and utilize the tool.
Startup
WebCT has several different components that must currently be started independently. Note that this documentation assumes that the user has already downloaded and installed the Jetty-6.x or -7.x servlet container and the CT3 trunk on the experiment's host machine (the computer that will run both the servlet container and the Colored Trails server). Jetty installation documentation can be found on their website, and instructions for obtaining CT3, installing Apache Ant, and building the CT3 project have already been written by the Colored Trails development team. It is also assumed that programs like Java and Ant have already been added to the PATH environmental variable if the host machine uses Windows.
In order to host the WebCT application, the contents of the WAR directory in the WebCT download must be copied to "...some path.../Jetty-...version.../webapps/<FOO>" where "FOO" is a directory whose name you want associated with the experiment. One example of the web application's final path might be "/home/skye/jetty-6.1.19/webapps/WebCT." After the WAR content is copied, Jetty will host the WebCT application on its own startup.
Jetty Servlet Container
To start Jetty, simply issue the following command from its top-level directory:
>>> java -jar start.jar
You can now see WebCT in action: just open a browser and type in the URL bar "http://localhost:8080/<FOO>" where <FOO> is the name you gave to the directory containing the WAR content in the servlet container. So if the WAR content is in "/home/skye/jetty-6.1.19/webapps/WebCT", then type in the address bar "http://localhost:8080/WebCT."
Colored Trails Server
You can choose to start an instance of the Colored Trails Server from either your web browser or the command line. To start it from the browser click on the the "Create Experiment" button in the WebCT web application interface. Then click "Initialize CT Server."
To start the CT server from the command line or terminal simply enter the command "ant runserver" in the top directory of your CT3 installation.
Clients
As a reminder, WebCT clients are still incomplete. They currently only work in the context of the TheAutomatConfig game and, even then, they still have restricted functionality.
WebCT clients can only be initialized from the web. Simply click the "Join Experiment" button and then the "Register As Participant" button. The browser page should display the message, "Waiting for the game to begin..." When the game does begin, this message will disappear and the GUI objects will be displayed.
Normal Colored Trails player GUI clients can be started alongside WebCT clients. For example, you could start a GUI client with command (more information about starting clients can be found in a README in the agents directory of the CT3 trunk):
>>>ant runclient1
After connecting the Java client to the server from its own GUI and then registering a WebCT client with the server from a browser, the two clients should be capable of playing the same exact game of Colored Trails! Of course, the game has to be started before this can happen.
It is important to note that the WebCT servlet container is currently configured to not allow more than two clients to register through it. This restriction will obviously be lifted in the near future.
Starting TheAutomatConfig game
You can start the game from either the WebCT browser application or the command line. To start it from the browser enter the "Create Experiment" page and press the "Start CT Game" button. To start the game from the terminal or command line enter the following command in the top-level of your CT3 directory:
>>>ant runadmin -Dconfigfile=lib/adminconfig/TheAutomat.txt
CT Browser GUIs
Only two Colored Trails GUI components, namely the board and phase table, have been developed thus far. While quite functional, these objects were designed mainly for demonstration purposes. Furthermore, the engineers behind CT3 are planning to completely overhaul the Colored Trails GUI, so it is likely that the WebCT Board and PhaseTable objects will be considerably modified before the official WebCT release. Nevertheless, limited discussion of these objects is included here for the benefit of developers new to GWT.
Here is the GWT code for the current Board GUI:
 package webct.client;

/*
 * The actual Web GUI object for the board. Notice that this is
 * an abstract class that, at the moment, requires users to implement
 * only one method. More abstract methods will probably be added in
 * the future (to incorporate features like drag and drop or arrow-key
 * presses)
 */

import com.google.gwt.event.dom.client.ClickEvent;
import com.google.gwt.event.dom.client.ClickHandler;
import com.google.gwt.user.client.Element;
import com.google.gwt.user.client.Window;
import com.google.gwt.user.client.rpc.IsSerializable;
import com.google.gwt.user.client.ui.FocusPanel;
import com.google.gwt.user.client.ui.Grid;
import com.google.gwt.user.client.ui.HTMLTable;
import com.google.gwt.user.client.ui.Image;
import java.util.ArrayList;

public abstract class Board extends FocusPanel{

	//The actual HTML table object that forms the basis
	//of the board
	protected Grid grid;
	//The width of the board in pixels
	//for example, the String might have a value of "300px"
	protected String boardWidth;
	//The height of the board in pixels
	protected String boardHeight;
	//The width of each cell in pixels
	protected String cellWidth;
	//The height of each cell in pixels
	protected String cellHeight;
	//A mapping from each grid cell to a color
	protected BoardColorScheme boardColorScheme;
	//A mapping from game item strings like "goal" to the
	//actual images (and details about them) that are displayed
	protected BoardIconInfo boardIconInfo;

	//Constructor
	public Board(String boardWidth, String boardHeight,
						String cellWidth, String cellHeight,
						int numRows, int numColumns,
						BoardColorScheme bcs, BoardIconInfo bii){

		boardColorScheme = bcs;
		boardIconInfo = bii;
		this.boardWidth = new String(boardWidth);
		this.boardHeight = new String(boardHeight);
		this.cellWidth = new String(cellWidth);
		this.cellHeight = new String(cellHeight);

		grid = new Grid(numRows,numColumns);
		grid.setWidth(boardWidth);
		grid.setHeight(boardHeight);

		//add mouse click handler to grid
		grid.addClickHandler(new ClickHandler(){
			public void onClick(ClickEvent e){
				HTMLTable.Cell cell = grid.getCellForEvent(e);
				int row = cell.getRowIndex();
				int column = cell.getCellIndex();
				mouseClickedCellAction(e);
			}
		});

          //----------------------------PAY SPECIAL ATTENTION HERE:--------------------------------
          //----------------------------                           --------------------------------
      		//get CellFormatter object
		HTMLTable.CellFormatter formatter = grid.getCellFormatter();

		//Format each grid object cell
		for (int i = 0; i < numRows; i++){
			for ( int j = 0; j < numColumns; j++){
				//Set the cell's width
				formatter.setWidth(i,j,cellWidth);
				//Set the cell's height
				formatter.setHeight(i,j,cellHeight);
				//Set the cell's background color. Note that we access
				//the actual HTML table's 'bgcolor' attribute to do this
				//Element objects refer to the actual HTML objects upon
				//which the GWT UI hierarchy is built
				Element cellElement = formatter.getElement(i,j);
				try{
					cellElement.setAttribute("bgcolor", boardColorScheme.getCellColor(i,j));
				}
				catch(CellDoesNotExistException cdnee){
					cellElement.setAttribute("bgcolor","000000");
				}
			}
		}
          //--------------------------------------------------------------------------------------
          //--------------------------------------------------------------------------------------
 		//Add the grid object to this Board object
		this.add(grid);
	}


	//Method that is supposed to determine what happens when a
	//location on the board is clicked by a user.
	protected abstract void mouseClickedCellAction(ClickEvent e);

	//Display game objects like players and goals on the board
	public void displayIcons(ArrayList<RowColStringTriple> mapItemList){
		try{
			//Clear cells
			for (int i = 0; i < grid.getRowCount(); i++){
				for (int j = 0; j < grid.getColumnCount(); j++){
					grid.setWidget(i,j,null);
				}
			}
			//Fill cells as suggested by the mapItemList
			for (int i = 0; i < mapItemList.size(); i++){
				RowColStringTriple rcst = mapItemList.get(i);
				int row = rcst.getRow();
				int column = rcst.getColumn();
				if (row >= 0 && row < grid.getRowCount()
					&& column >= 0 && column < grid.getColumnCount()){
						String val = rcst.getValueString();
						IconInfo iconInfo = boardIconInfo.getIconInfoByName(val);
						Image icon = new Image(iconInfo.getIconURL());
						icon.setWidth(iconInfo.getWidth());
						icon.setHeight(iconInfo.getHeight());
						grid.setWidget(row,column,icon);
				}
			}

		}
		catch(IconNotFoundException infe){
			Window.alert("Error in CTWebBoard.displayIcons() method!");
		}
	}


}
This code should be self-explanatory with GWT's UI documentation at hand. The snippet of code highlighted by the "Pay Special Attention Here" comment boundaries, however, merits discussion in order to save new GWT programmers confusion. Notice that features of the grid object's cells are modified in two different ways in the highlighted segment. To set each cell's width and height, HTMLTable.CellFormatter methods are used. Utilizing this object and its methods is reminiscent of performing GUI table development with Java's AWT and Swing kits. Unfortunately, the HTMLTable.CellFormatter object does not have methods to directly change each cell's background color (which is of course massively important to Colored Trails). Generally, however, visual details that are not directly accessible through the GWT UI API can be modified by accessing the actual underlying HTML tag elements. GWT uses Element objects to refer to these underlying HTML components, and you can set tag attributes like "bgcolor" to the same values as would be possible if you were writing actual HTML code or dynamically interacting with a page's Document Object Model (DOM) via Javascript.
The ability to access underlying HTML element attributes removes the necessity of using Cascading Style Sheets (CSS) in WebCT. Any formatting possible through CSS can now be done using GWT widgets. For example, here is the code for the WebCT PhaseTable object:
 package webct.client;

/*
 * The actual Web GUI object for the phase table. Notice that this is
 * an abstract class that, at the moment, requires users to implement
 * only one method that specifies the widget's behavior when the its
 * internal timer reaches zero during a phase.
 */

import com.google.gwt.user.client.Element;
import com.google.gwt.user.client.Timer;
import com.google.gwt.user.client.ui.FocusPanel;
import com.google.gwt.user.client.ui.Grid;
import com.google.gwt.user.client.ui.HTMLTable;

public abstract class PhaseTable extends FocusPanel {

	//The actual GWT pre-made widget that forms the visual basis
	//for this object
	private Grid grid;
	//A list of PhaseInfo object (which contain phase names and timelength)
	private PhaseInfoList phaseInfoList;
	//A boolean indicating whether or not this phase table "knows"
	//the current phase
	private boolean currentPhaseIsKnown;
	//The name of the current phase
	private String currentPhaseName;
	//The index of the current phase in the phaseInfoList object
	private int currentPhaseListIndex;
	//The timer this object uses
	private Timer timer;
	//The number of seconds remaining in the current phase
	//(needed for clock display purposes)
	private int secondsRemainingInPhase;


	//Constructor
	public PhaseTable(PhaseInfoList phaseInfoList){
		this.phaseInfoList = phaseInfoList;
		currentPhaseIsKnown = false;

		//Build Grid and static components
		grid = new Grid(phaseInfoList.size(), 2);
		for (int i = 0; i < phaseInfoList.size(); i++){
			grid.setText(i,0,phaseInfoList.get(i).getPhaseName());
		}

             //----------------------PAY SPECIAL ATTENTION HERE:----------------------------
             //----------------------                           ----------------------------
		//Format Overall Grid object (not the individual cells yet)
		Element tableElement = grid.getElement();
		String styleString = "border-width:2px;border-spacing:0px";
		styleString += "border-style:solid;border-color:black;";
		styleString += "border-collapse:collapse;background-color:white;";
		tableElement.setAttribute("style",styleString);
             //-----------------------------------------------------------------------------
             //-----------------------------------------------------------------------------

		//Initiate Timer
		timer = new Timer(){
			public void run(){
				if (secondsRemainingInPhase > 0){
					secondsRemainingInPhase--;
					display();
				}
				else{
					timer.cancel();
					tablePhaseClockIsZero();
				}
			}
		};

		this.add(grid);
		display();
	}

	//Starts the timer. Visually speaking, this method also starts the
	//"timing down" of the time left in the current phase
	public void startClock(){
		timer.scheduleRepeating(1000);
	}

	//Stops the clock. Visually speaking, the time remaining that is
	//displayed in the GUI freezes
	public void stopClock(){
		timer.cancel();
	}

	//Displays the GUI's visual elements. In "Swing" terms, this function is
	//equivalent to "repaint()" and is called whenever an aspect of the GUI
	//has changed.
	public void display(){

             //------------------------PAY SPECIAL ATTENTION HERE:--------------------------
             //------------------------                           --------------------------
                //Reset each of the table's cells
		String styleString = "border-width:2px;padding:3px;border-style:solid;";
		styleString += "border-color:black;background-color:white;";
		styleString += "-moz-border-radius:0px;";
		HTMLTable.CellFormatter formatter = grid.getCellFormatter();
		for (int i = 0; i < phaseInfoList.size(); i++){
			for (int j = 0; j < 2; j++){
				Element cellElement = formatter.getElement(i, j);
				cellElement.setAttribute("style", styleString);
			}
			grid.setText(i,1,"");
		}

		if (currentPhaseIsKnown){
			//Give special appearance to the current phase table row
			styleString = "border-width:2px;padding:8px;border-style:solid;";
			styleString += "border-color:black;background-color:#ff69b4;";
			styleString += "-moz-border-radius:0px;font-weight:bold";
			Element cellElement = formatter.getElement(currentPhaseListIndex,0);
			cellElement.setAttribute("style", styleString);
			cellElement = formatter.getElement(currentPhaseListIndex, 1);
			cellElement.setAttribute("style", styleString);

			//Display remaining time for current phase
			int minutes = secondsRemainingInPhase/60;
			int seconds = secondsRemainingInPhase%60;
			String time;
			if (seconds < 10){
				time = minutes + ":0" + seconds;
			}
			else{
				time = minutes + ":" + seconds;
			}
			grid.setText(currentPhaseListIndex, 1, time);
		}
             //-----------------------------------------------------------------------------
             //-----------------------------------------------------------------------------
	}

	//Sets the current phase to whatever phase the newPhaseName argument
	//matches.
	public void setCurrentPhase(String newPhaseName){
		timer.cancel(); //in case timer is still running
		//Set current phase name
		currentPhaseName = new String(newPhaseName);
		//Find the index of the current phase in the phaseInfoList
		int i = 0;
		boolean newIndexFound = false;
		while(!newIndexFound && i < phaseInfoList.size()){
			if (phaseInfoList.get(i).getPhaseName().contentEquals(currentPhaseName)){
				currentPhaseListIndex = i;
				newIndexFound = true;
			}
			i++;
		}
		//Establish the number of seconds remaining in the phase
		secondsRemainingInPhase
			= phaseInfoList.get(currentPhaseListIndex).getTimeLength();

		//This object now knows the current phase
		currentPhaseIsKnown = true;
	}

	//This is an abstract method that developers should implement to
	//specify exactly what happens when the secondsRemainingInPhase
	//field reaches zero
	public abstract void tablePhaseClockIsZero();

}
The sections demarcated by the "Pay Special Attention Here" comments demostrate how the 'style' attribute for HTML elements can be set to values like "border-width:2px;padding:8px;border-style:solid;border-color:black;background-color:#ff69b4;-moz-border-radius:0px;font-weight:bold." Setting the 'style' attribute in this manner is the method by which the subtle visual details of WebCT will primarily be controlled.
Jetty and the WebCT Servlet
Between the Jetty, GWT, and Java Servlet documentation, almost every aspect of the WebCT RPC system is thoroughly explained. It is particularly important to review the GWT documentation on RPCs to understand WebCT browser-server communication. Unfortunately, the WebCT servlet differs from the servlet examples that appear in GWT tutorials because of its reliance on Continuation objects.
WebCT's need for Continuation objects arises from inherent limitiations in the client-servlet model. Servlets by definition receive data from some source, perform actions, and then (possibly) return more data. Servlets are not designed to send data to a source without being prompted by a request from that source. Unfortunately, browsers connected to WebCT have no way to know if the CT game state has been changed without requesting a servlet service. Of course, this means that browser GUI displays could be kept up-to-date by repeatedly sending requests to the server. Polling at a regular interval, however, would clog the servlet than necessary for low activity games. The stress on the server would be further exacerbated by reducing the polling interval to the point where "lag" between game-state changes and browser GUI updates was unnoticeable.
The WebCT servlet extends the AsyncRemoteServiceServlet class and utilizes Continuations in coordination with UpdateManager objects to eliminate the need to poll for game-state information. In its current form, the WebCT browser page executes the method listenForUpdates() as soon as the page is used to register a participant to the CT server. The code for this recursive method (before compilation into Javascript) is as follows:
	public void listenForUpdates(){
                //wctsa stands for WebCTService Async and is the object that communicates with the
                //the servlet.
		wctsa.getGameUpdate(clientPIN, new AsyncCallback<Update>(){
			public void onFailure(Throwable t){
				Window.alert(SERVER_ERROR);
			}
			public void onSuccess(Update result){
				if (result.getObjectID().contentEquals("board")){
					BoardUpdatePackage bup = (BoardUpdatePackage)(result.getObject());
					BoardColorScheme bcs = bup.getBoardColorScheme();
					BoardIconInfo bii = bup.getBoardIconInfo();
					ArrayList<RowColStringTriple> mapItemList = bup.getMapItemList();

					Board tempBoard = new webct.client.Board("240px","240px","55px","55px",4,4,bcs,bii){
						public void mouseClickedCellAction(ClickEvent e){
							//do nothing
						}
					};
					tempBoard.displayIcons(mapItemList);
					board = tempBoard;
					buildGameGUI();
				}
				else if (result.getObjectID().contentEquals("start")){
					buildGameGUI();
				}
				else if (result.getObjectID().contentEquals("phases")){
					PhaseInfoList phaseInfoList = (PhaseInfoList)(result.getObject());
					PhaseTable tempPhaseTable = new PhaseTable(phaseInfoList){
						public void tablePhaseClockIsZero(){
							//do nothing
						}
					};
					phaseTable = tempPhaseTable;
					buildGameGUI();
				}
				else if (result.getObjectID().contentEquals("set phase")){
					StringWrapper newPhaseNameWrapper = (StringWrapper)((result.getObject()));
					phaseTable.setCurrentPhase(newPhaseNameWrapper.string);
					phaseTable.startClock();
					buildGameGUI();
				}

				listenForUpdates();
			}
		});
	}
Notice that the Update objects that are being returned to the browser during these asynchronous RPCs can essentially contain any possible game-state update: in the method's current form it checks if the update is related to the game starting, a board change, or a phase change. In terms of implementation, Update objects wrap and IsSerializable object and a String that is meant to identify the update type. The term serializable refers to the ability to convert Java objects to pure byte code and vice versa; serializability is an important attribute of Java object information that can be transmitted over the Internet. It should be noted that just because an object implements IsSerializable or can be cast to IsSerializable does not mean it is actually serializable by GWT standards. These standards are clarified in the GWT documentation and should be reviewed by anyone new to working with Update objects on the server side.
After thorough perusal of the listenForUpdates() code one might question why a StringWrapper object, rather than just a String, is sent back to the browser during a "set phase" type update. Such a wrapper exists because String objects, while actually serializable, are not assignable to an IsSerializable object (even using a cast). Therefore the String must be wrapped in an object that implements the IsSerializable interface. Similar wrappers must also be used for primitive types, Java's default primitive wrappers (like the Integer or Boolean classes), and Java collections.
Unfortunately, the servlet side code's getGameUpdate() response method is markedly different from anything found in a GWT tutorial:
        /*
	 * This method is used to get updates related to changes in the
	 * actual CT game state.
	 */

	public Update getGameUpdate(int clientPIN){
		//Get the particular client that corresponds with the
		//parameter pin
		WebPlayerAdaptorImpl client = clientTable.get(clientPIN);
		//Access the client's update manager
		UpdateManager um = client.getUpdateManager();

		//Check if new update is available
		if (!um.hasFreshContent()){
			//Get the request object associated with this particular service
			//request
			HttpServletRequest request = this.getThreadLocalRequest();
			//Create a new continuation object based on the current request
			Continuation cont = ContinuationSupport.getContinuation(request,null);
			//Tell the update manager to re-request this server when it has new
			//content
			um.registerAsRecipient(cont);
			//Terminate this request by throwing a special exception
			cont.suspend(0);
		}

		//Get new update
		Update retUpdate = um.retrieveNewUpdate();

		return retUpdate;
	}
Instead of extending the RemoteServiceServlet class as per most GWT tutorials, WebCTServiceImpl (WebCT's servlet class) extends AsyncRemoteServiceServlet, which is a class available from the org.mortbay.gwt package. The line "cont.suspend(0)" actually causes the AsyncRemoteServiceServlet to throw a special type of Exception object that the Jetty servlet container handles differently than other types of Exceptions. Usually when it catches an exception from a servlet request method, Jetty sends a failure response to the requesting browser. However, when the Exception thrown by cont.suspend() is caught, Jetty actually actually sends no response; instead it stores data that allows for the same request to be retried when the resume() method of the Continuation object that originally called suspend() is executed. In the case of WebCT, UpdateManager objects are responsible for calling Continuation objects' resume() methods. So when "um.registerAsRecipient(cont)" is executed, the specific UpdateManager "um" is being told to call the "resume()" method of the "cont" object as soon as "um" has new update content.
By the time an actual Update object is returned to the browser page, the servlet method "getGameUpdate(int clientPIN)" has been executed twice if the UpdateManager object did not have fresh updates when the method was originally called. Notice that the getGameUpdate browser request would never return a value if the corresponding WebCT client never generated a new Update object. If a positive int argument had been passed to the "cont.supend()," the Continuation would have automatically been resumed after a number of milliseconds matching the argument, at which point the servlet's getGameUpdate method would have been retried.
Participant Clients
There are two WebCT client classes that, together, will allow participants to play CT over the web. WebPlayerAdaptorImpl implements the ColoredTrailsGUI interface and contains the client's necessary game discourse handlers. The code for WebPlayerAdaptorImpl is modeled after the class ctgui.original.GUI. WebPlayerAdaptorImpl contains an instance of a WebCTClientImpl, which is responsible for making changes to the game state and passing along appropriate GUI updates to its own UpdateManager object. The code for WebCTClientImpl is modeled after edu.harvard.eecs.airg.coloredtrails.client.ui.SimpleGUIAgentImpl.
WebCTClientImpl is, at this time, incomplete. Many of its current methods fail to pass GUI update data to the UpdateManager since the WebCT browser-side GUI library is not yet fully developed. For example, there is presently no transaction GUI that allows players to see their own chips or exchange chips with other players. As a result, no information about players' chips is being sent to clients' update managers at any point in the WebCTClientImpl code. A start game message, board information bundles, and phase information are all that the participant browser code is equipped to handle at the moment. The WebCT development team will give the WebCTClientImpl object a full array of update capabilities as soon as the browser GUI library is finished.
Developers playing with the current WebCTClientImpl source code should also note that the boardUpdated() method code uses a lot of value hardcoding that is not appropriate for all CT games (the current code has been developed in coordination with TheAutomatConfig configuration class). Instead of looking up the actual mapping of game objects to board images in the underlying CT objects, for example, such a mapping (BoardIconInfo object) is hardcoded with the following lines:
        //Initialize BoardIconInfo object
        //THIS SECTION MUST BE REWRITTEN
        BoardIconInfo bii = new BoardIconInfo();
        //Set icon info for players
        ArrayList<ClientPlayerStatus> playerList = this.getGameStatus().getClientPlayers();
        //System.out.println("playerList size: " + playerList.size());
        for (int i = 0; i < playerList.size(); i++){
        	ClientPlayerStatus player = playerList.get(i);
        	int pin = player.getPin();
        	if ( pin == Integer.parseInt(this.getPin()) ){
        		bii.addIconInfo(pin + "","images/me.gif","35px","35px",5);
        	}
        	else{
        		bii.addIconInfo(pin + "","images/them" + (pin/10) + ".gif","35px","35px",5);
        	}
        }
        //Set icon info for goals
        bii.addIconInfo("goal","images/goal.gif", "45px","45px",5);
Also notice how the width, height, and priority-level (which will determine icon overlap on the board in the future) is also hard-coded for the IconInfo objects being added here. Ideally, dimensional and overlap setting information would instead be plucked out of the underlying CT game objects. The current CT3 trunk code, unfortunately, does not make such information available. Pending changes to the trunk will allow WebCTClientImpl's boardUpdated() method to be rewritten so that it functions correctly.